

When you begin a major renovation (or a home building project), it can feel overwhelming and intimidating. You may fear the budget will spiral out of control or the end space will not resemble what you had envisioned. It requires a great deal of both money and emotions. What you need is a strategic plan that can ensure you’re covered for everything involved in the process. Refer to this guide to learn how to effectively plan a major home renovation that will add lasting value to your home and bring you joy without regret.

Phase 1: Define Your 'Why' – The Foundation of Your Renovation
Before swinging a hammer or calling a contractor, the reason behind your renovation needs to be understood. Thinking about the future saves the most money and heartbreak. It is about moving beyond style and function to your home’s future.
Renovate or Move Out: Which is Better for You?
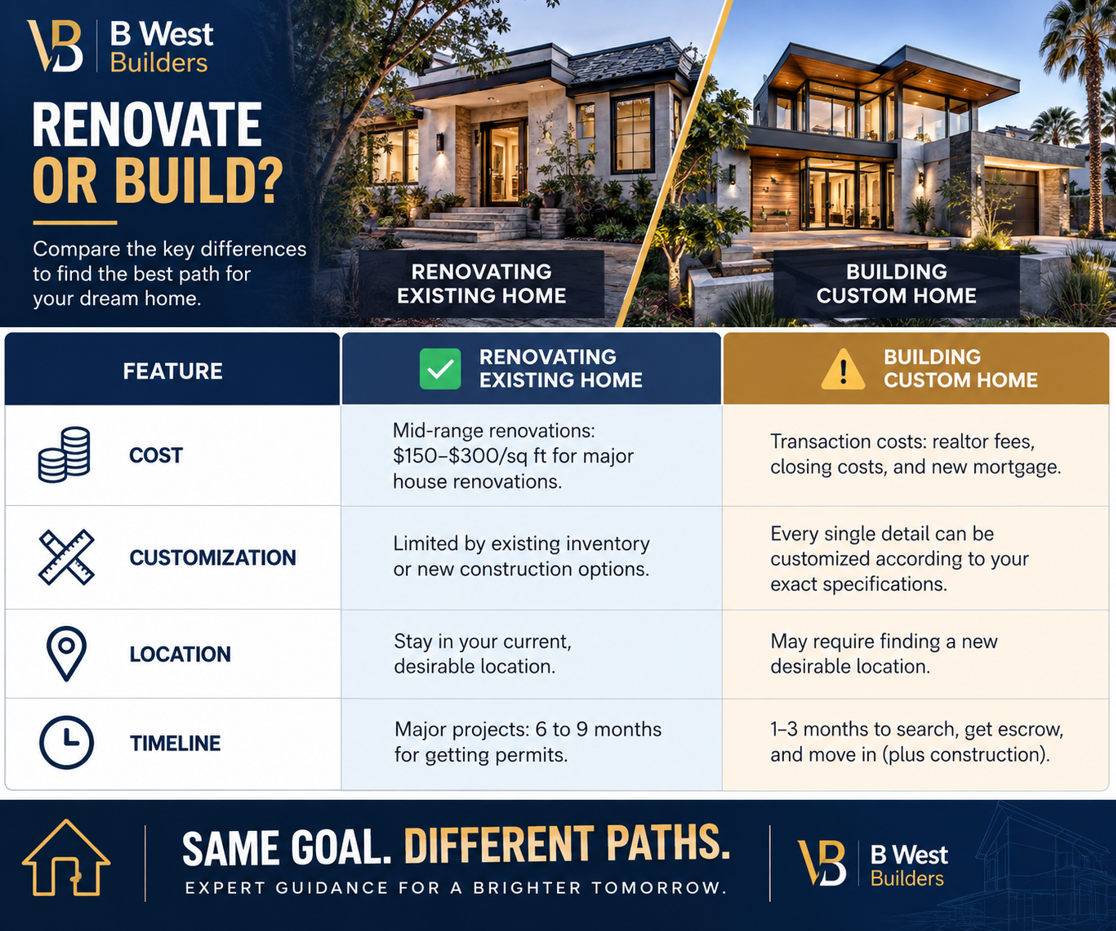
The first question a homeowner should ask is whether they want to renovate or if it makes more sense to move. Homeowners frequently undertake remodeling projects and regret that they should have moved instead of modifying. Here’s a handy comparison to help you decide.
Quick Comparison: Renovating Existing Home vs Building Custom Home
Creating Your Non-Negotiables List
As soon as you decide to remodel, be clear about the difference between your must-haves and nice-to-haves. This will be your guiding star when budgetary choices become challenging. For instance, a kitchen for entertaining might be an essential, while heated floors in the master bath may be a desirable. Making priorities ensures your core needs are met.
Considering the Future: Resale Value or Personal Enjoyment?
While you’re renovating for today’s needs, consider how your renovation may affect your home’s future resale value. If you’ve always dreamed of a bright green kitchen, it’s understandable. However, a more neutral color palette will likely appeal to a wider range of buyers down the road. In terms of resale value, kitchen and bath updates nearly always fetch the highest return on investment, 70% to 85%.
Phase 2: Master Your Money with a Realistic Budgeting Plan
Facing a budget discussion is never easy. However, being upfront and honest about your expected renovation budget is your best defense against cost overruns. This isn’t just a spreadsheet, it is the financial strategy for a significant investment.
The Structure of a Renovation Budget
Most large home renovations generally break down as percentages of cost. Although these differ depending on project and location, a rough guide can help.
- The skilled trades, general contractor management, and labor (30–40%).
- Materials (30–40% of the cost).
- Cabinetry, countertops, lighting, plumbing fixtures, and appliances (10–20%).
- Fees and permits (LADBS permits, architect/engineer fees, city surcharges) (5–10%).
The Critical 20% Contingency Fund
Most homeowners appear to forget this: you should absolutely have a contingency fund for older homes. As a rule of thumb, we advise reserving 20% of your total estimated project cost for contingencies. For example, during a client’s kitchen remodel last year in Hancock Park, we opened a wall and discovered knob-and-tube wiring plus water damage. That cost an additional $8,000 to the scope. In the end, that 20% contingency saved the client.
Accounting for 'Soft Costs' Beyond the Quote
Many homeowners forget about “soft costs” that can add up quickly. Renovating a property might entail some unexpected and hidden costs. These may include temporary housing if you need to move out, storage for your furniture, and increased utility bills during reconstruction. Moreover, eating out more. Or even hiring a cleaning service once the dust settles. Afford items you want.
Exploring Different Finance Options
You have options for a major renovation. A Home Equity Line of Credit (HELOC) allows you to withdraw money as needed. On the other hand, a cash-out refinance usually features lower interest rates but means getting a new mortgage. Construction loans are tailored for major projects and release funds in installments. Different options have different advantages and disadvantages, so consult a financial advisor to see what fits your situation.
Phase 3: Assemble Your Expert Team of Contractors in Los Angeles
It is very important to find the right professionals. This is more than a straightforward Google search; it’s a professional vetting process to ensure quality, reliability, and assurance.
Where to Find a Trusted Expert (Beyond Google)
To locate building contractors in Los Angeles, begin the search beyond online ads. For answers to questions about remodeling, check out The National Association of the Remodeling Industry (NARI) along with local builders’ associations. Architects have a trusted network of contractors they typically call on. Even suppliers of materials can help you with referrals to people who use their quality products.
Checklist: Seven Questions to Ask Every Contractor
When you have a bunch of candidates, interview them properly. Refer to this checklist for your conversations.
- Do you have a California license and insurance? Make sure to check their CSLB license online.
- Could you share some examples of similar projects you did?
- How do you go about managing change orders if the scope changes?
- What is your process for communicating within the project?
- Can you give me the estimated timeline for this renovation project?
- How do you guarantee the safety and cleanliness of the job site?
- Can you furnish a minimum of three recent references?
Understanding the Tender: Why the Cheapest Bid Isn't Always Best
When you compare rates, don’t just select the lowest one. When you get a proper “line-item bid,” it’s far better than a lump-sum quote because it will separate costs for labor, materials, and specific tasks. This transparency offers an apple-to-apple comparison where each contractor has fully priced out identical scope and material quality. It is often the case that the cheapest bid is not the wisest option.
What to Ask Previous Clients When Checking References
References must be called. Avoid asking only, “Were you happy?” Try, “What was the best part of your day?”
- How did they deal with problems or unforeseen circumstances when they appeared?
- Did the project finish by the deadline and within budget? If not, what were the reasons?
- Was the site clean and organized throughout the work?
- Will you employ them again for another project?
Phase 4: Design and Planning – From Mood Board to Blueprint
The design and planning phase converts the mood board into a blueprint for the project. It connects your vague ideas (like Pinterest boards) to a vision board. It is a place where your vision takes shape and prevents design regret.
Harnessing the Power of a Unified Vision via a Mood Board
Creating a mood board is more than loading pretty pictures; it’s about sending your designer and contractor a clear message about the style, color palette, and feel of the space you are imagining. Use Pinterest or Canva to collate your ideas, but make sure to physically bring actual building material samples (paint chips, fabric swatches, flooring samples). Being consistent results in cohesive design.
Establishing a Floor Plan and Workflow: Function First
A beautiful space with great aesthetics will work in your favor no matter what you do in your daily life. When choosing kitchen amenities, a suite that serves the “work triangle” (sink, stove, refrigerator) is the classic. To imagine yourself performing some of your daily activities, walk through the physical space in the required room. What are the places you need outlets? Where do you store items? Recognizing these issues now helps your layout facilitate your lifestyle.
Remember Electricals and Lighting
Lighting is an often underrated but significant design component. Lighting can be classified into three types: Accent lighting, Ambient lighting, and Task lighting. Each plays its own useful role. Make sure to install plenty of outlets, as we need devices nowadays. Adding outlets to a plan is much cheaper than cutting existing walls later on.
Phase 5: Navigating the Maze of Home Remodeling in Los Angeles
A home remodeling project in Los Angeles comes with its own set of challenges and regulations. Grasping these local details is essential for the entire project.
Understanding the LADBS and the Permitting Process
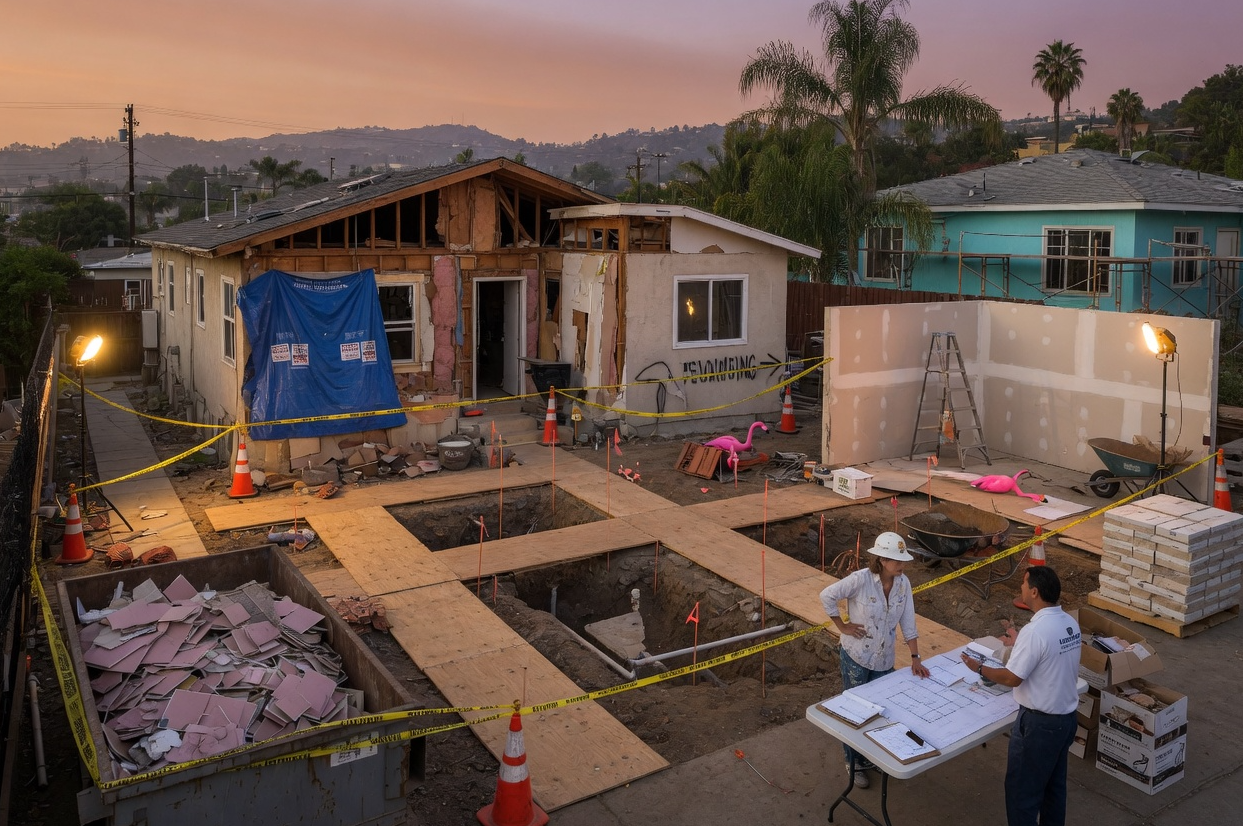
The majority of Los Angeles construction is overseen by the Los Angeles Department of Building and Safety. One must get a permit for any construction-related activity that involves any change in structure or electrical, plumbing, or mechanical components. Smaller projects-like painting or replacing cabinets-usually do not require permits. Your contractor should be doing the permitting and ensure code compliance on all plans. Plus, inspections are done at each phase. If you skip permits, you could face $10K+ in fines, forced restoration, and trouble selling your home.
California’s Energy Efficiency Standards (Title 24)
California’s energy code impacts renovation choices significantly. The code outlines the energy efficiency requirements for glass, insulation, HVAC, and lighting. Although it may seem to raise your initial costs, such as by requiring higher-efficiency windows. This is a long-term benefit that will ultimately save you money on your utility bill and increase your home comfort and value. For instance, heat pump water heaters are usually mandated in major overhauls per the 2024 Title 24 updates.
Examining Local Aesthetics and Zoning (HPOZ)
Many Los Angeles neighborhoods are also subject to unique zoning regulations or HPOZ (Historic Preservation Overlay Zone). Should you reside in an HPOZ zone such as Highland Park or Silver Lake, you will need design review and approval for exterior alterations. This can add 3-6 months to your timeline. Before going through with your design, check for any local restrictions.
Phase 6: The Contract – Maximum Protection for Your Project
More than paperwork, your construction contract should serve as your essential tool for building trust and managing risk. This document protects both you and your trusted contractor.
Essential Elements of a Strong Contract
Inclusion of these items in your contract is a must.
- Every work item, material, and fixture specified.
- Payment schedule: Milestone payments (never a large upfront payment).
- A project timeline with milestones (start date, key completion dates, and a finish date).
- Change order process (how changes are documented, priced, and approved).
- Documentation to exhibit insurance for General Liability and Workers’ Compensation.
- Lien waivers prevent your property from being subjected to a lien by subcontractors who are not paid.
Payment Schedules and Lien Waivers Explained
A payment schedule based on milestones means you pay for work that is completed and satisfactory. If you constantly come across contractors who are requesting excessive upfront payments, then be careful. California law states that a contractor’s deposit cannot exceed one thousand dollars ($1,000) or ten percent (10%) of the total contract cost, whichever is less. A lien waiver is a document that the contractor and their subcontractors sign to confirm they have been paid and will waive their right to lien your property. Always receive one with each payment.
Phase 7: Project Management and Sanity During the Dust Phase
While the building phase is mired with disruptions, there are practical strategies with which you could easily reduce stress and keep your sanity. Managing expectations is key!
Getting into a Communication Groove
It is essential to communicate regularly and consistently with your “project manager.” Set a weekly meeting time where you can discuss progress, what’s next, and issues. A shared document to track progress, questions, and decisions can save you here too. It is helpful to stay aligned.
Organizing Your House for Construction Work
Take preliminary measures before demolition. Ready all non-essential items, especially those near the renovation. Wrap furniture with plastic sheets, and block the renovation area with temporary dust barriers. Formulate a “safe zone”. If your house is particularly dusty or noisy, create your own space. Let your neighbors know about the work planned ahead. A heads-up is always good.
Finding Your Way Through All the Waits and Choices
Fixing Up A Home is a Big Job. Supply chain issues related to custom cabinets (which will be improved in 2024, but still require an 8- to 10-week lead time) are common, as are structural finds that were unexpected. Gear up for delays – Do not hesitate when presented with an option. Stick with the change order process you agreed on upfront to handle any changes in scope. Trust that your contractor can walk you through the solutions.
Phase 8: The Final Section – Punch Lists and Last Payment
We are about to cross the finish line! These final steps guarantee that the project is completed to your satisfaction and the quality you paid for.
How to Do a Final Walkthrough of Your Home
Make sure you do a thorough final walkthrough before packing up. Examine paint finishes in varying lighting, verify proper installation of all hardware, and test each fixture and appliance. Mark any mistakes with blue painter’s tape or other non-permanent tape for your contractor to fix. Please use your non-negotiable list from Phase 1 to cover everything.
How to Make a Punch List
A punch list is a document detailing what is left for the contractor to complete. Be concise and specific. Rather than sending a flurry of texts or emails, just send one long list. Initially focus on safety or functional issues, followed by aesthetics. This helps the contractor deal with everything.
When to Make That Final Payment
Your final payment gives you the maximum leverage to secure the completion of all punch list items to your standards. Do not hand it over until every item on the punch list has been resolved and you are truly pleased with the work. It is common for the contractor to hold back 5–10 percent of the total contract value until completion and sign-off.
To avoid having regrets with your home renovation projects, you need a solid plan during the renovation process. By defining your ‘why’, mastering your budget, assembling an expert team of building contractors in Los Angeles, designing with purpose, navigating local complexities, ensuring contract strength, managing proactively, and closing out diligently, you will transform your house into a home designed for you, just the way you want. Begin Phase 1 today and plan a major home renovation that will profoundly improve your life for many years to come.
Frequently Asked Questions About Home Renovation
How much does a major home renovation typically cost?
Major home renovations can vary significantly, but a rough estimate for mid-range projects is typically $150-$300 per square foot. This cost includes labor, materials, and fixtures, but it's crucial to allocate an additional 20% for unexpected contingencies, especially with older homes.
How long does a major home renovation project usually take?
The timeline for a major home renovation can range from 6 to 9 months, primarily due to the time required for obtaining permits from local authorities like the LADBS. Design, contractor selection, and the actual construction phase will add to this duration, so planning for potential delays is wise.
What is the most important item to include in a renovation budget?
The most critical item in any renovation budget is a 20% contingency fund. This reserve is essential for covering unforeseen issues, such as discovering old wiring or water damage in existing walls, which can significantly impact the project scope and cost if not budgeted for.
Do I need permits for all home renovation projects in Los Angeles?
In Los Angeles, you generally need a permit from the LADBS for any construction activity that alters the structure or involves electrical, plumbing, or mechanical components. Smaller projects like painting or replacing cabinets typically do not require permits, but it's always best to confirm with your contractor.
What is a lien waiver and why is it important for homeowners?
A lien waiver is a document signed by your contractor and their subcontractors, confirming they have been paid for their work and are waiving their right to place a lien on your property. Always obtain a lien waiver with each payment to protect yourself from potential legal issues if a subcontractor claims non-payment.
How can I ensure my renovation design aligns with my vision and avoids regret?
To ensure your design aligns with your vision, start by creating a detailed mood board with specific styles, colors, and material samples. Establish a functional floor plan that prioritizes workflow, especially in areas like the kitchen, and consider lighting and electrical needs early in the planning phase to prevent costly changes later.
Ready to Achieve Your Dream Home?
Transform your living space into the home you’ve always envisioned, without the stress or regret
Why Choose Our Construction Experts:
- Licensed & Insured Professionals
- Deep Expertise in LA Zoning & LADBS Procedures
- Transparent Pricing & Detailed Project Planning
- Proven Track Record of Client Satisfaction
Get Started Today:
- Call: (213) 410-4183
- Schedule: Book a complimentary property assessment online
- Special Offer: Get a detailed project estimate today!